 Environment


|
 Environment Environment |        | Using the Dialog & PQLForms Painters |
       |
All the dialogs in the SIR/XS system interface have been created and can be modified using the dialog painter.
Dialogs generated using the Dialog Commander can be used with the dialog painter not vice versa.
To run the dialog painter from the menu system, select Program, Dialog Painter...
and enter a member or filename that either contains a dialog painter program or
does not exist. The dialog painter can also be started by editing a member from the members dialog where the member contains "|| Generated by DP ..." as the first line of text.
You use the dialog painter to control the layout of the dialog; the type, size and position of the individual controls on the dialog. From the dialog painter you can call other routines that control the rest of the dialog program.
|
Label Edit Button CheckBox Radio Choice List (M) Text Horizontal Line Vertical Line Rectangle (S) Image ComboBox Progress Bar Tree control Slider Spin Properties... List view... Check &Alt-Keys Help ? Undo Save Save as... Exit |
The New control (label,Edit,Button etc) commands insert a control of that type at the point where the mouse click occurred or, if the mouse was not used, just below the last control. The control can then be dimensioned as required. The Properties (Enter) command controls the properties of the whole VisualPQL program. The List View command shows the sequence in which dialog controls are processed and allows you to change this. Check &Keys checks for duplicate alt+letter shortcuts and displays a list of duplicates as well as list of assigned and available letters. Help (F1) displays this help page. Undo (Ctrl+Z)undoes the last painter action or set of moves or resizes. Save saves the dialog program to the current file or member. Save as... prompts for a file and saves the dialog program to that file. Exit terminates the painter, prompting to save any changes.
|
Once you have put a control on the canvas, right mouse click over it to see a menu of commands related to this control.
|
Properties... Clone Down First Last Move Up Move Down Delete Exit |
The Properties (Enter) command controls the properties of this particular
control. This includes the VisualPQL executed when this control is used in the dialog. Clone Down creates a copy of the control (same size and text) just below the original. First,Last,Move Up and Move Down change the order in which the dialog items are processed. This is the order of focus when the tab key is used to move around controls in the dialog (or in the painter). Note that Radio buttons are considered to be in the same group if they are defined together with no intervening control. Delete removes the control from the dialog. It does not remove any associated VisualPQL code that you have entered but this is not executed as long as no other control re-uses the deleted ID.
|
You can select multiple controls by holding down the left mouse button and dragging to create a rectangle around them, or by holding down CTRL and selecting each of them. A right mouse click on one of the selected items displays a menu of commands related multiple controls.
|
Align Left Align Right Align Top Align Bottom Align Row Centre A&lign Column Centre Space Evenly Across Space Evenly Down Abut Across Abut Down Same Width Same Height Clone Down Delete Exit |
The Align Left, Right, Top & Bottom commands align the selected controls with the control that was right mouse clicked. That control does not move. The Align Row Centre command aligns all selected controls with the control that was right mouse clicked using vertical centre alignment. That control does not move. The Align Column Centre command aligns all selected controls with the control that was right mouse clicked using horizontal centre alignment. That control does not move. The Space evenly commands keeps the position of the top/right most control and the bottom/left most control and moves the others so that the space between each control is the same. The Abut commands keeps the position of the top/right most control and moves the others so that there is no space between each control. The Same Width & Height commands resize all selected controls to be the same as the control that was right mouse clicked. That control does not change. Clone Down creates a copy of each of the selected controls (same size and text) just below the original. Delete removes the controls from the dialog.
|
You can also insert new controls using the Insert key and selecting the type or by pressing one of the character keys L(label) E(edit) B(button) K(check) R(radio) C(choice) M(list) T(text) H(horizontal line) V(vertical) S(box) or I(image). If the mouse is not used then the new control is placed just below the previous control.
If more than one control is selected then all are resized or moved.
       |
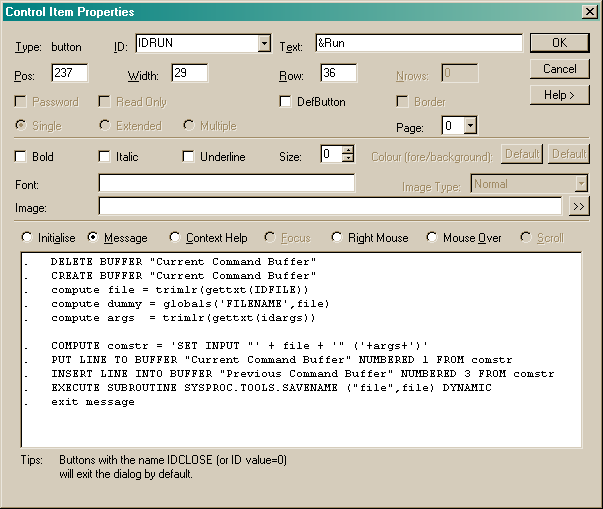
ID Gives the control's name. Internally these identifiers are unique numbers. The painter automatically assigns numbers to the names.
Pos,Width,Row,Nrows Set the control's position and size. Some control types have predefined height.
Password Readonly Set attributes for text controls. Password will hide entered text and read only will prevent text modification.
DefButton Sets this button as the default button on the dialog. There can only be one default button. This will be the action taken when the user presses the enter key (unless a text control has the current focus).
Border Displays a rectangle around the control.
Single Extended Multiple Sets the type of list selection. Single allows exactly one selection. Extended is the same as single except you can select more items using shift, ctrl or by dragging the mouse. Multiple allows for zero or more items to be selected.
Page Sets the dialog page where this control will be displayed.
Bold Italic Underline Set these attributes for the control's font.
Size Sets the relative font size. 0 (zero) is the default size, 1 or more is larger, -1 or less is smaller than normal.
Colour Sets the foreground and background colour for the control.
Font Sets the font name for the control's text.
Image Type Can be either normal, centre or resize to position the image within the control area.
Image Sets the bitmap file image for the image or button control. If this is a button then the image ill be used instead of the button text.
In the lower part of the dialog is a text box that contains the VisualPQL commands that are executed when various messages associated with this item are sent from the windows system to the VisualPQL program.
The Initialise section contains the VisualPQL that is executed when dialog is initialised. You could also put this code in the dialog properties initial section. Defining it here makes it easier to find the control specific code using the dialog painter.
The Message section contains the VisualPQL that is executed when the button is pressed, or a change is made in an edit, choice, check box, list or radio control, or the mouse is clicked in an image.
The Context Help section contains the VisualPQL that is executed when the HELP button is pressed or the question icon on the dialog frame is pressed followed by a click on this control. The code typically pops an information box with some kind of help about the control. E.g:
DISPLAY INFOBOX "Enter your FULL name"
The Focus section applies to edit and multi-line text controls. It contains the VisualPQL that is executed when the control is left (ie looses focus). This VisualPQL might be used to validate a string or perform some other action based on the entire string. The ordinary edit messages are sent each time a character is typed.
The Right Mouse code is executed when the right mouse button is pressed on a control.
The Mouse Over code is executed when the mouse pointer hovers over a control.
The Scroll message applies to lists and multiline text controls. The code is executed when the list or text is scrolled and it passes the position of the top visible item or line as arg1. Use this message along with the SETPOS function to implement synchronised list scrolling.
IDCLOSE and IDSTATIC that are always assigned the values 0 (zero) and -1 respectively.The value -1 need not be unique, many controls in the dialog can have this identifying value but no processing can occur on these controls. They are usually labels or lines.
VisualPQL code is generated to terminate the dialog when a control with an identifying value of zero (IDCLOSE) is used. You can define code that is executed before the dialog terminates. Closing the dialog using the X (or Alt+F4 in Windows) sends a message with ID zero to the VisualPQL program.
Names beginning with "UD" (for user defined) are not automatically preset in the generated program and you must assign values to these yourself. This is useful when you want to have a meaningful assignment of numbers to identifiers (eg a set of radio buttons with values and labels "2006","2007","2008","2009").
You can use numbers (integers greater than -1) as control identifiers in the painter.
All other identifying names are assigned a unique arbitrary positive integer value.
m_id m_arg1 m_arg2
and m_page are declared and used in the generated VisualPQL program. Do not use these variable names as control identifiers.
m_id contains the value of the dialog item that has just been pressed or changed.
m_arg1 and m_arg1 contain more information on the control.
m_page indicates which pane of a multi-paned dialog is displayed.
       |
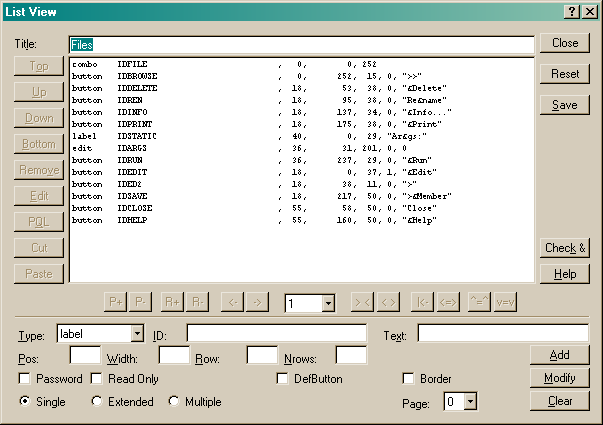
The dialog is split into two parts with a horizontal line. The top part controls the layout of the whole dialog. The Dialog title is the text to display in the title bar of the generated dialog. The main box under the title is a list of the controls currently defined for the dialog. A new control can be added by making selections in the bottom section of the designer and pressing Append. There are a number of action buttons down the left and right of the control list as follows:-
IDCLOSE value 0 (zero) and IDSTATIC value -1. These names can be used many times in a dialog but cannot be reference by the VisualPQL code (ie you cannot modify or read values during execution).
Any name starting with uppercase ID is automatically assigned a unique numeric value. If the id does not start with ID then you must define and set it to a unique number in the PROLOGUE section.
       |
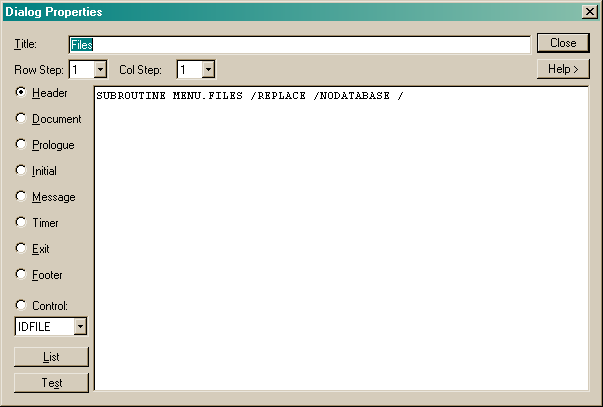
Below are some settings specific to the painter. The Row and Col step set a grid size for use in the painter. You can also set the dialog page to display if there is more than one page defined.
The left side of the Dialog Commander is a list of the sections in this program. The default program sections are Header, Document, Prologue, Initial, Message, Timer, Exit, Footer and specific Control:. the right side of the dialog is the VisualPQL code associated with the current section. You can modify this code.
Header
The text associated with Header typically includes the command to identify the beginning of a VisualPQL routine i.e. PROGRAM or RETRIEVAL or SUBROUTINE.
If it does not then the generated code must be included in a program and cannot be run stand-alone.
Document
This text will become a comment at the start of the generated program.
Prologue
The Prologue contains code to be executed before any other executable commands.
Initial
The Initial section contains the code to initial the controls in the dialog.
Message
The Message section contains the code executed each time a dialog event message is issued, irrespective of which control is involved.
Timer
The Timer section contains the code executed when a timer message is sent. The timer is set with the ENABLE TIMER n command. This command makes the timer message block execute every n/10 seconds. The DISABLE TIMER command stops timer messages.
Exit
The Exit section contains the code executed after the dialog is removed from the screen.
Footer
The Footer should include the corresponding END command from the Header.
e.g. END PROGRAM. The Footer can also be used for user subprocedures.
Control:
The Control: section contains the VisualPQL message block for the control selected in the choice. This is the same code as the message block in the control properties dialog.
       |
|| Generated by DP - don't edit anything outside |{...|}

|{ Header
Header section VisualPQL
|}

integer*4 m_id, m_arg1, m_arg2

integer*4 IDSTATIC; preset IDSTATIC (-1)
integer*4 IDCLOSE ; preset IDCLOSE  ( 0)
integer*4 ....... ; preset .......  ( 1)
integer*4 ....... ; preset .......  ( 2)
...

|{ Prologue
Prologue section VisualPQL
|}

dialog "...title"

|{ Controls
Control layout definition
|}

initial
|{ Init
Initial section VisualPQL
|}
end initial

message ALL m_id, m_arg1, m_arg2

|{ Message
general Message section VisualPQL|} ifthen (m_id eq CONTROL_ID ) |< CONTROL_IDControl message section VisualPQL
|>
next message
endif

if (m_id eq 0) exit message

end message

|{ Context Help
message HELP m_id

ifthen (m_id eq CONTROL )
|< CONTROL_ID
Control context help section VisualPQL
|>
next message
endif


end message
|}
message FOCUS m_id
|{ Focus

ifthen (m_id eq CONTROL )
|< CONTROL_ID
Text Focus-out message section VisualPQL
|>
next message
endif


|}
end message
message TIMER
|{ Timer
Timer message section VisualPQL
|}
end message

end dialog
|{ Exit
Exit section VisualPQL
|}
|{ Footer
Footer section VisualPQL|}
       |
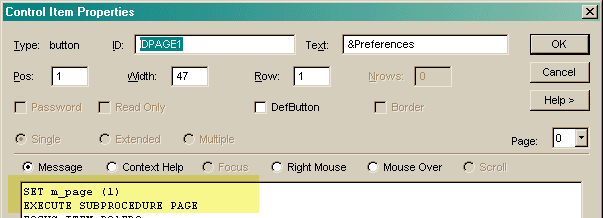
You can change a controlís page number in the control item properties screen.

To make a dialog with multiple pages using the painter you need some switching method. If this is under user control this might be a choice control or a set of buttons. You can also use paging to show or hide controls under other conditions.
The switch must change the value of the variable m_page and then EXECUTE SUBPROCEDURE PAGE.
|| Generated by DP - don't edit anything outside |{...|}

|{ Header
PROGRAM
|}

integer*4 m_id, m_arg1, m_arg2

integer*4 IDSTATIC; preset IDSTATIC (-1)
integer*4 IDCLOSE ; preset IDCLOSE  ( 0)
integer*4 IDBUTT1 ; preset IDBUTT1  (1 )
integer*4 IDEDIT2 ; preset IDEDIT2  (2 )
integer*4 IDPAGE1 ; preset IDPAGE1  (3 )
integer*4 IDPAGE2 ; preset IDPAGE2  (4 )
integer*4 m_page; preset m_page (1)

|{ Prologue
|}

dialog ""

|{ Controls
postype 1
button    IDBUTT1 ,  14,        0, 120, 0, "Press ME"
edit    IDEDIT2 ,  14,        0, 117, 0, 0
radio   IDPAGE1 ,   0,        2,  40, "Page 1"
radio   IDPAGE2 ,   0,       52,  40, "Page 2"
|}

initial
|{ Init
|}
. EXECUTE SUBPROCEDURE PAGE
end initial

message ALL m_id, m_arg1, m_arg2


ifthen (m_id eq IDBUTT1 )
|< IDBUTT1
display infobox "Thank you"
|>
next message
endif

ifthen (m_id eq IDPAGE1 )
|< IDPAGE1
SET M_PAGE (1)
EXECUTE SUBPROCEDURE PAGE
|>
next message
endif

ifthen (m_id eq IDPAGE2 )
|< IDPAGE2
SET M_PAGE (2)
EXECUTE SUBPROCEDURE PAGE
|>
next message
endif

if (m_id eq 0) exit message

end message


end dialog
|{ Exit
|}
|{ Pages
SUBPROCEDURE PAGE
.  HIDE ITEM IDBUTT1
.  HIDE ITEM IDEDIT2
.  IFTHEN (m_page EQ 1  )
.    SHOW ITEM IDBUTT1
.  ENDIF
.  IFTHEN (m_page EQ 2  )
.    SHOW ITEM IDEDIT2
.  ENDIF
END SUBPROCEDURE
|}

|{ Footer
END PROGRAM
|}
       |
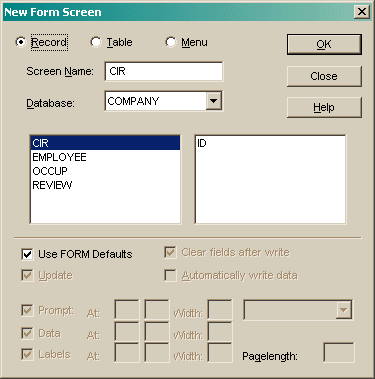
Run the painter from the menu system by selecting Program, PQLForms Painter... and entering a member or filename that either contains a PQLForms program or does not exist.
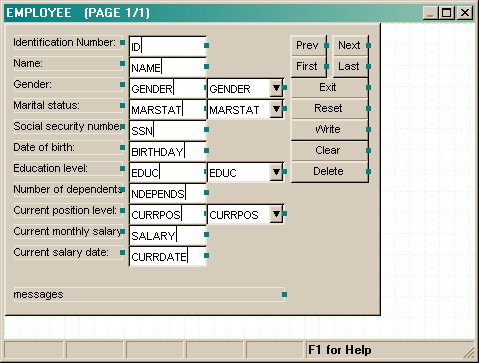
The PQLForms painter allows you to control the layout of a form screen; the type, size and position of the individual controls on the form.
WRITE SCHEMA command with the PQLFORMS option.
|
New Field New Local Var New Call New Action Button New Text New Horizontal Line New Vertical Line New Box New Image Screen Properties Field Sequence Test Help Undo Exit |
The New Field command inserts a field from the current record or table. The New Local Var command inserts a field based on a derived variable. The New Call command inserts a CALL button to access another PQLForms screen. The New Action Button command inserts an Action Button. A list of Action button types is given. Action buttons can be used to navigate through the data in to form or to execute some user defined VisualPQL. The New Horizontal Line, Vertical Line and Box commands draw lines on the screen. The New Image command defines a bitmap image area for the screen. The Screen Properties (Enter) command controls the properties of the whole PQLForms screen. It also lets you set which page of the VisualPQL screen is visible on the painter canvas. The Field Sequence command lets you change the order in which the fields are processed (using the tab key). This does not change the visual layout. It also lets you define pages of the screen and move fields from one page to another. Test (F5) executes the VisualPQLform layout commands (not the processing commands) so you can see how the final layout looks. Help (F1) displays this help page. Undo (Ctrl+Z)undoes the last painter action or set of moves or resizes. Exit terminates the painter, prompting to save any changes.
|
Once you have put a field or button on the canvas, right mouse click over it to see a menu of commands related to this control.
|
Select set Properties... Delete Exit |
Select Set selects any Prompt, Data and Label for the field, allowing it to be moved as a group. The Properties (Enter) command controls the properties of this particular field or button. This includes the VisualPQL executed after the field is entered. Delete removes the field or button from the dialog.
|
When you have more than one field on the canvas, you can select more that one control (by dragging a rectangle around them with the mouse, or CTRL and select), right mouse click on one of the selected items to see a menu of commands related multiple fields.
|
Align Left Align Right Align Top Align Bottom Align Row Space Evenly Same Width Same Height Properties... Delete Exit |
The Align Left, Right, Top & Bottom commands move all selected controls into alignment with the control that was right mouse clicked. That control does not move. The Align Row command move all selected controls into vertical centre alignment with the control that was right mouse clicked. That control does not move. The Same Width & Height commands resize all selected controls to be the same as the control that was right mouse clicked. That control does not change. The Properties... option will display a multiple field properties dialog which will allow changing of attributes across all selected fields. Delete removes the fields from the dialog.
|
PQLforms coordinates are based on text rows and columns. Fine movements and resizing cannot be made.
If more than one control is selected then all are resized or moved.
       |
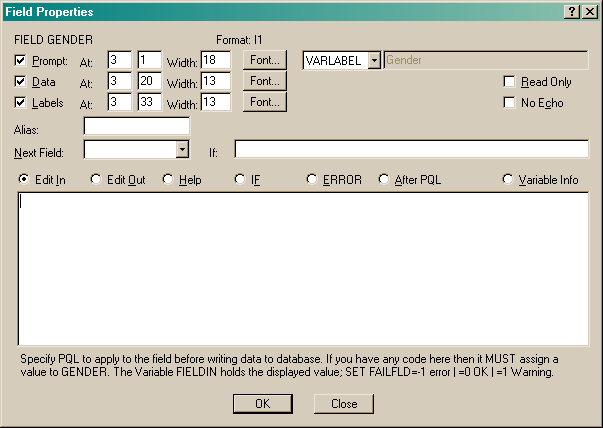
The Position and size of the prompt, data, and labels can be manually altered here or in the painter canvas. You can set various font attributes for prompt, data and label using the corresponding Font... button.
Check the Read Only box to make the field not updatable by the forms user.
Check the No Echo box to make the field secret. When data are entered into these fields they are displayed as asterisks.
The Alias field can be used to enter the variable's name if this field's name is not a record variable. Use this if you have several variables in the database with the same name but different data types. You would give each of these different field names with aliases to the real variable name.
Select a Next Field which the keyboard focus will move to after this field. Optionally enter an If condition for the next field processing.
The radio buttons correspond to various field clauses. See the PQLForms FIELD page for full details.:
COMPUTE ssn = REPLACE (fieldin,'-','',LEN(fieldin),1,0)
compute fieldout = edit (ssn,"^^^-^^-^^^^")
 47     'Not a valid value'
 57     'Failed Edit tests'
       |
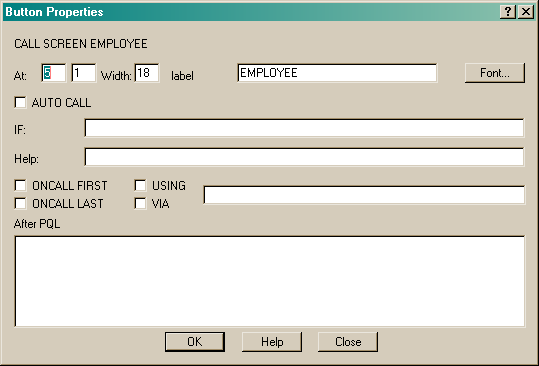
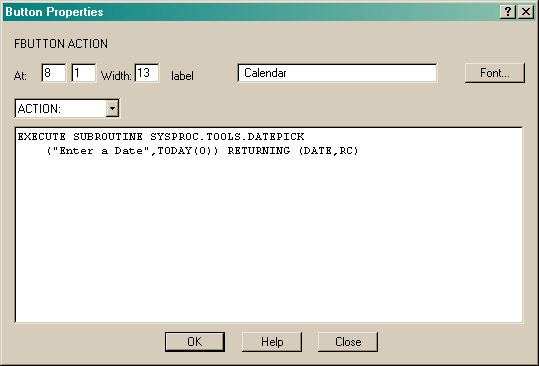
The Position and size of the button can be manually altered here or in the painter canvas. You can set various font attributes for the button text using the Font... button.
Check the AUTO CALL box to make the button hidden and automatically call the screen after processing the previous field (an AUTO CALL button cannot be the first control in the screen). The button will still be visible in the painter but not when the form is run.
Enter an IF condition which must be true to allow the button to be pressed.
Specify a HELP string expression which is displayed when the user requests context sensitive help on the button.
Check ONCALL LAST or ONCALL FIRST to go automatically to the first or last record when the screen is called.
Check USING or VIA to specify the keys to use when calling the record. USING needs a case id and keys whereas VIA just needs the record keys.
After PQL specifies PQL code executed after the button has been presses. This can be multi-lined code and there is no need to end lines with ;.
       |
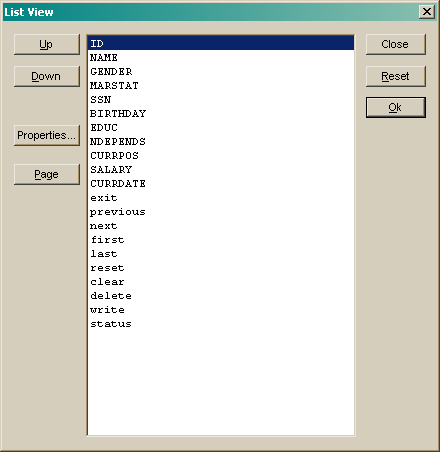
The list shows variables in processing order. Select a variable and use the buttons on the left to move the field up or down in the processing order. Press the Page button to insert a page break between fields.
The field sequence does not effect the position of the fields on the screen.
       |
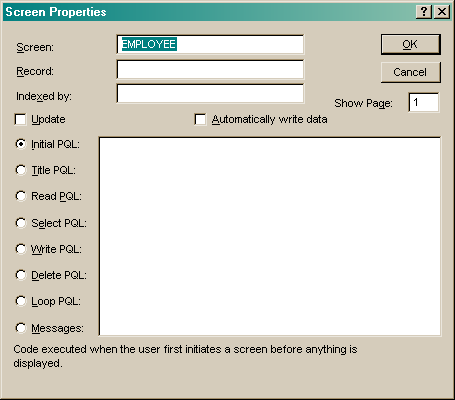
The Screen name is specific to this PQLForms program and is used to reference the screen in CALLs from other places in the program.
The record name defines which database record or tabfile table the screen accesses.
The Index name defines which database or tabfile index is used to process the data.
You can enter VisualPQL code to execute at various stages of data entry.
Initial Code is executed when the screen is first called.
Title Code is executed when each page is first displayed. Use this to set the dialog title.
Select Code is executed after a data record is read from the database. Set FAILFLD to non-zero to
skip this record and read the next.
Read is executed after a data record is read from the database.
Write before the form data is written to the record.
Loop is executed every time a field is processed.
       |
       |